

Using Active Recall to Study More Effectively
Feel foggy-headed when revising for exams? Active recall, a process which involves actively testing knowledge throughout the revision process, can be…
Knowing how to take notes is often something we take for granted but there are proven methods and employing one or a mixture of these can make all the difference to your chances of success at work or whilst in education.

We can all agree that note-taking is important, but what’s the best way to go about taking notes? The best way to take notes is personal and depends on your learning style, the type of content you’re working with, and the amount of time you have. Ultimately, the best note-taking method for you is always going to be the one that will encourage you to learn and retain information as effectively as possible and you may opt to combine a variety of methods depending on the information you are digesting at the time.
This section looks at the most commonly used note-taking techniques so you can decide what may work best for you. By testing and developing these techniques you can make sure that the time you spend taking notes is really worthwhile.
Professor Walter Pauk of Cornell University created The Cornell Method in the 1950s. It’s a simple note-taking approach, for use in any situation, that divides a page into three sections:

Method: Draw a line across the bottom of the page, starting 2 inches up from the bottom. Then draw a straight line up from this section, around 2.5 inches in from the edge of the left side. Use the right section for abbreviated notes and the left for key ideas or themes. Then summarise each theme with bullet points at the bottom.
Pros:
Cons:
The origins of the Outlining Method aren’t clear. But it offers a simple, structured approach in the form of creating an ‘outline’. In essence, note-takers write sentences using bullet points and line dashes. Starting with a main topic, they can highlight key points and use subtopics and supporting facts to back them up. It may look something like this:
Method: Draw a bullet point and a sentence for your main topic. Leave a space or indentation for any additional information underneath, starting with a line dash. Then, list out your supporting facts, ideas, or thoughts as numbered points underneath.
Pros:
Cons:
This approach allows note-takers to organise thoughts into branched topics or subjects. Doing so can highlight existing or potential relationships between them. It’s a graphic representation that may start with a main point and then link out to related points via arrows or channels. And, in this sense, it’s a form of ‘mapping out’ interconnected thoughts or related topics.
Want to Know More About Our Products?
Method: Draw out your main topic at the top of the page, using a box or bubble. Then divide the topic into subtopics using a box or bubble underneath. Keep dividing it from the left and right. As an alternative, you can use a mind-mapping format. This is where you draw out your map from the middle and branch outward, surrounding the central idea with related subtopics.
Pros:
Cons:
The Charting Method uses a grid system that can work well for organising and comparing ideas, concepts, or topics. Note-takers can draw a series of columns with headers, and then add their topics at the side to create rows. This is a way to split up a page into different sections a bit like it was a Google Sheet or Excel spreadsheet.
Method: Consider the categories you want to review ahead of the lecture and how they would fit into a grid system on the page. Draw vertical lines across the page, evenly spaced, with a short block across the top to write headers. Then draw horizontal lines across the columns and use the first column to input each topic.
Pros:
Cons:
This approach can be useful during fast-paced lectures where you need to take down lots of information. It involves writing a single, numbered sentence for each fact, topic, or idea and starting each one on a new line. Of course, a single sentence may not be enough to include every thought or topic, so a ‘sentence’ may become a ‘paragraph’ but should be short.
Method: Lined paper may be useful in this instance. Start the first topic with a number 1. Then write a sentence or two – no more than three if possible.
Pros:
Cons:
The process of note-taking can be passive or active. When it’s passive, you may find it harder to take in and retain the information you’re given.
Active note-taking is a more deliberate approach that can help your brain assimilate information and maximize your note-taking session’s learning potential.
Examples of passive note-taking include actions such as copying information verbatim, highlighting and underlining words, or writing notes down on every topic rather than picking the most important ones.
Visual note-taking combines images, drawing, and visualisation with text to form graphic representations of information. It’s a real-time note-taking technique that may include using pens, paper, and illustrative skills. But it can also involve the use of digital tools to enable clear graphics and graphic depiction or visualisation.
The technique is a non-linear approach to note-taking that facilitates connections between content and topics. Many learners respond well to visual stimuli and find this method easier to absorb.
Sometimes people speak of ‘Sketchnotes’ as the same thing as visual note-taking. While Sketchnotes is a form of visual note-taking, it focuses on handwriting and drawing skills. It’s a specific process for writing down thoughts and ideas using illustrations, symbols, structures, and texts.
Visual note-taking includes Sketchnotes but is much broader. It includes digital tools and assistive technology that support data visualisation and creative skills.
A mind map is a diagram that offers a way of connecting ideas around a single concept. By creating branches of subtopics from a single thought or idea, mind maps can illustrate how different ideas and concepts relate to a central theme.
Mind maps can break down information into a central or core concept. Or they can create new, related themes or ideas from a single starting point. That starting point can even be an image, word, or task. But, the mind map must attempt to illustrate how these concepts connect to or relate to the central theme.
To create a mind map, place a theme at the centre of a page. This can be a title, subject, task, thought, or image. Using curved lines to branch outwards, create a range of associated ideas or titles that connect to this central idea. Try to write a single word to identify each idea rather than using too many words or sentences. You can use different colours for each branch, subtopic, or idea. Think of your mind maps like a tree sprouting branches outward and keywords describing associated concepts as the leaves.
Pros:
Cons:

Learn more about our monthly newsletter for neurodiverse professionals
A concept map is similar to a mind map but allows you to plot associations and connections between multiple concepts. As opposed to the single, central idea in a mind map, concept maps explore connections between several ideas. They’re often used in education and corporate settings to explore structures and their interconnected relationships.
To create concept maps you can use different shapes, arrow connectors, and focus keywords. Start by choosing or listing out your set of topics and subtopics. Then, organise each theme by linking them back to a main idea. You can use linking words to do this, showing the relationships between core ideas.
There are different types of concept map structures to choose from:
Pros:
Cons:
A flowchart is a concept map that helps visualise a data sequence based on a series of data or actions moving through different points. As a visual note-taking tool, it’s useful for breaking narratives into a sequence or individual steps.
Visual note-taking using flowcharts is also known as ‘Flow-Based’. With this method, the goal is to focus on learning during a lecture or presentation and not only to transcribe. Each element or topic in a flowchart tends to have its own graphic representation with arrows and lines linking up the stages in between.
Three principles underline this approach:
Pros:
Cons:
A Thinking Map is a form of visual note-taking that can help to visualise various thoughts and ideas in graphic form. They’re particularly useful for visualising abstract concepts and for boosting comprehension. And they’re a form of explorative note-taking and visualisation that can boost collaboration, creativity, and design.
There are eight specific types of Thinking Maps that learners can use to explore concepts and build on their ideas:
A graphic organiser is a teaching tool used to educate pupils. It can include many, if not all, of the full range of visual note-taking tools. As a key pedagogical tool, it’s primarily used to demonstrate key concepts and relationships between objects visually to aid in learning and understanding.
There are many different types of graphic organisers you can use for note-taking:
Invented by mathematician John Venn, the Venn Diagram is a well-known tool for revealing the differences and similarities between things using coloured circles. As a simple tool for understanding patterns and the overlaps between different ideas, a Venn Diagram tends to include at least two interlocking circles that help to compare and contrast the characteristics of two things.
Creating a Venn diagram using visual tools should be fairly straightforward. It’s a simple approach that requires coloured circles that overlap. In each circle, you would write notes that describe the characteristics of what the circle represents.
Different Venn diagrams work with different data sets. And so there are different Venn diagram options:
Five set diagrams: Usually, a five set Venn diagram is the maximum you could expect to use for comparing data sets. Even at five, things could get too complex and unwieldy.
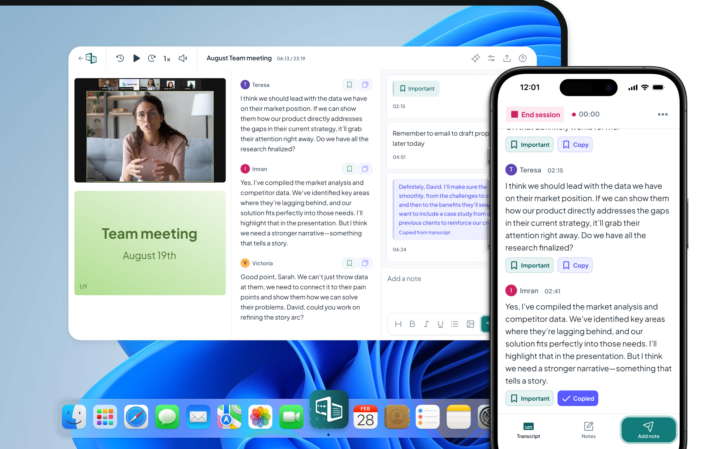
Caption.Ed is a dynamic note-taking and captioning tool available on desktop and as a mobile app. It works across all platforms including Blackboard, Panopto, MS Teams, and Zoom. Students who qualify for the Disabled Students’ Allowance (DSA) can get access to two exciting packages to meet their needs – the Notes Bundle and the Pro Bundle (depending on the outcome of their assessment).
Caption.Ed can also elevate staff performance levels when used as part of a workplace needs assessment or the Access to Work scheme. By allowing staff greater autonomy and control over productivity and communication, Caption.Ed is recognised as an effective AT tool that will make a difference for your teams.

Our small but mighty team builds leading-edge software that people love. We pride ourselves on a user-led approach to product design. The voice of the customer shapes what we create and that’s exactly how great assistive tech should be made.
Feel foggy-headed when revising for exams? Active recall, a process which involves actively testing knowledge throughout the revision process, can be…

YouTube has become an invaluable platform for sharing information, entertainment, and sharing educational content. Whether you’re a content creator, researcher or…

You may be new to Microsoft Teams or a veteran user. Whatever your experience, you should know how to record a…